Using the scripts
Most custom content requires some script, that is either added directly to the content or tells the mod about the content.
Generally, you have two ways to work with the scripts. Either through an external tool (the VS Code text editor), or the scripting window inside TTS. The first method is the preferred way. While it requires a bit of setup, it’s a lot easier to continuously work on custom content with it. E.g. it will be a lot easier to update the scripts of the content to the latest version used by the mod without the need to copy and paste a lot of code and unpack deeply nested bags in TTS (heck you can do everything without TTS if you want, even releasing the custom content mod).
The alternative is to use the TTS scripting window.
For this, you need to download the latest script from the releases.
After you download the scripts from the latest release, you’ll find two folders inside there: base and bundled.
You’ll need the bundled folder to work with the TTS scripting window.
Extract the required folder somewhere in your file system.
Using VS Code
Setup
-
Download and install Node.js.
-
Download and install VS Code.
-
Create a new directory for your custom content project, where you want to work on it.
-
Download the package.json file and put that into the directory.
-
Open VS Code and open the directory. This can be done by using the menu or by dragging the directory onto the workspace in VS Code.
-
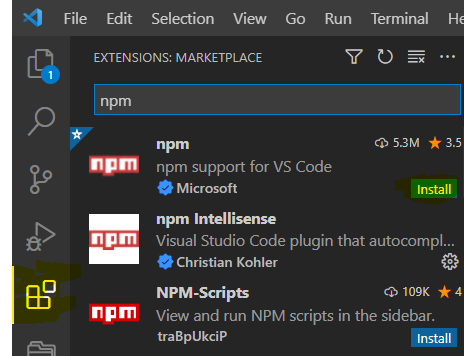
Install the extension "npm" by clicking on the menu with four blocks on the left bar.
-
Locate the save file you want to edit inside the TTS save directory (checkout the knowledge base to find the default locations for your system). It can either be a regular save or a saved object. Copy the name of the save file (e.g.
TS_Save_1072for regular saves orArtificierif you have a saved object with this name). -
Open the
package.jsonfile in your working directory. Change the two occurrences of<save-name>, to the name of the save file. E.g. with the save file nameTS_Save_1072, the section would look like this:

-
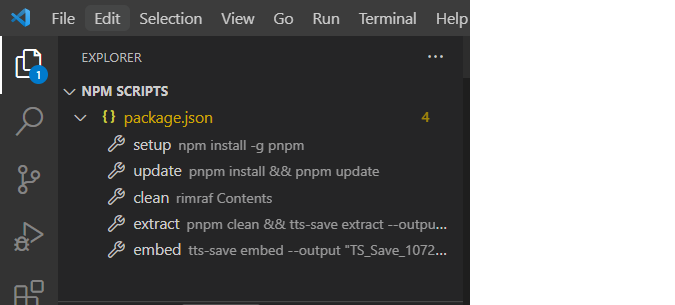
After you installed the above-mentioned npm extension, you’ll have the following section in the explorer in VS Code
-
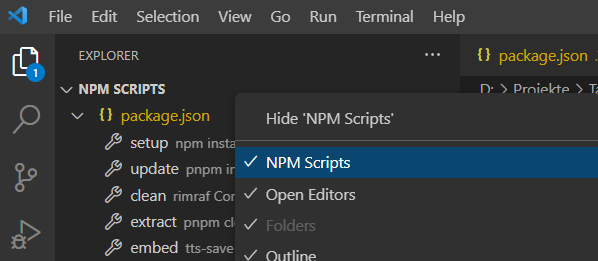
It may be not at the top but below other sections. You can reorder sections by using drag 'n' drop. If the section doesn’t show up at all, right-click on the heading of any other section and enable it.
-
Hover over the
setupentry and click the Play button that shows up. -
Afterwards, do the same with the
updateentry. This will download the latest scripts for the Gloomhaven enhanced mod. -
This completes the (rather long) setup, and you’re good to go. :-)
-
If you have multiple save files you are working on, it’s recommended to have different directories for all of them. This way you don’t have to edit the
package.jsonaround.
Usage
To start working on the save file, press the Play button on the entry extract inside the npm section.
This will basically copy the save file from your TTS save file location and split it into multiple files inside the Contents directory if your current working directory.
E.g a (reduced) Artificier save file looks like this:
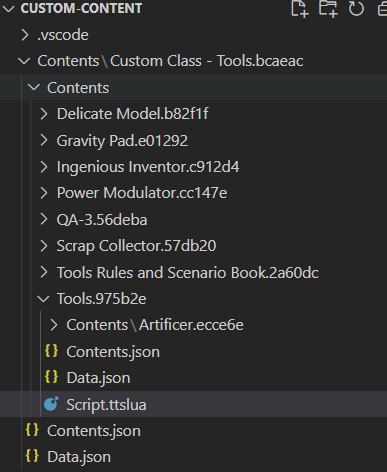
The save file has one bag that contains all objects of the Artificer.
The extract command will create a new directory for all objects inside that bag.
The name of the directory will be the name of the object followed by its GUID.
If the object itself is a bag or deck it will create more nested directories to replicate the nesting structure from TTS.
For each object, multiple files are created inside their directory.
A file named Data.json will contain all the data about the object, like its name, tags, etc..
The file named Script.ttslua contains the attached script.
The big advantage here is that the script only contains the relevant parts.
In the TTS script editor, you have the whole script which contains a lot of unrelated stuff and you have to find the correct place where to put the actual scripts.
A file named UI.xml contains the XML UI attached to the object.
The same logic as for the script applies, as it only contains a reduced view of the script (e.g. just some <Include src="Figures/CharacterMini" />).
When you use the embed command from the npm section, the reverse thing will happen.
The files from your current working directory will be put together and create a new save file which then will be copied back to your TTS save file folder.
While doing so, all the scripts of all contained objects are automatically updated with the currently downloaded GHE scripts.
E.g. many scripts have commands like require("Figures.CharacterMini").
What this means is: Please include the code from the file "Figures/CharacterMini.ttslua" at this place, computer (the same for <Include src="file" /> in case of XML files).
And this is what embed does.
It loads the downloaded scripts and embeds them in the correct places.
So the advantage is, that you only need to edit the relevant scripts and all other parts are automatically updated for you. No need to unpack nested objects inside TTS and copy/paste the same scripts over and over.
If there’s an update to the release scripts, you can use the update command from the npm section to download them.
Then use embed again and all scripts are updated in the save file.
- NOTE
While working with scripts from a beta version, make sure the following line is in your package.json, inside the devDependencies section.
"@gloomhaven-enhanced/api": "beta",
If you are later working with the released scripts replace beta with latest und use the update command.
In addition to changing the scripts, you can also change the for all nested objects (e.g. changing its name or adding tags), by editing the Data.json of it.
Be aware though that the actual name (the one you can edit in the TTS UI) is called "Nickname" in the file, not "Name".
Changing "Name" will pretty much break the object.
You can also add tags by adding and entry to the Tags property.
If the data currently doesn’t have a Tags property, you can easily add one somewhere like this:
{
  "GUID": "975b2e",
  "Name": "Custom_Model_Infinite_Bag",
  "Nickname": "Tools",
  "Tags": [
    "Tag1",
    "Tag2"
  ],
  "Description": ""
}
Using the TTS script editor
When using the TTS scripting editor, you have to use the bundled version of the scripts.
We developed the mod by splitting the scripts into different files which makes it a lot easier to maintain.
However, TTS doesn’t understand that splitting and requires to have one script per object.
So all files need to be bundled together into one file again for TTS to work.
Normally, this would be done by the Atom plugin automatically.
The scripts within the bundled folder are the result of such a bundling.
The scripts then are rather big and also contain code to make the bundling work.
They always look like this:
-- Bundled by luabundle {"version":"1.6.0"}
local __bundle_require, __bundle_loaded, __bundle_register, __bundle_modules = (function(superRequire)
	local loadingPlaceholder = {[{}] = true}

    -- ..
    -- lots more lines
    -- ..
end)(require)
__bundle_register("__root", function(require, _LOADED, __bundle_register, __bundle_modules)
-- This is the relevant part
require("Figures/CharacterMini") -- this line also has to be removed
-- The required code goes here
end)
__bundle_register("Figures/CharacterMini", function(require, _LOADED, __bundle_register, __bundle_modules)
-- ..
-- even more lines here
-- ..
end)
When you integrate those scripts you need to look for the line bundle_register("root", function(require, _LOADED, bundle_register, bundle_modules).
Everything between this line and the first end) is the actual script for the object.
The previous line is required for the bundling to work and the following lines are the previously split files that are now put together.
You don’t need to touch those.
Whenever this documentation mentions including a script onto your object, you first have to locate the correct bundled file. This is given as the title of the script example.
info = {
    hpColour = "#5080C1",
    hpTextColour = "#B70F0F",
    startingHealth = 10,
}

FrameOffset = 230

require("Figures.CharacterMini")
E.g. here it means you have to find the Figures/CharacterMini.ttslua script within the bundled folder.
Open that script and find the previously mentioned bundle_register("root") line.
Copy the script of the documentation mentioned after this line and remove everything till the first end (excluding the end).
With this example, the final script would look like this:
-- Bundled by luabundle {"version":"1.6.0"}
local __bundle_require, __bundle_loaded, __bundle_register, __bundle_modules = (function(superRequire)
	local loadingPlaceholder = {[{}] = true}

    -- ..
    -- lots more lines
    -- ..
end)(require)
__bundle_register("__root", function(require, _LOADED, __bundle_register, __bundle_modules)
info = {
    hpColour = "#5080C1",
    hpTextColour = "#B70F0F",
    startingHealth = 10,
}

FrameOffset = 230

require("Figures.CharacterMini")
end)
__bundle_register("Figures/CharacterMini", function(require, _LOADED, __bundle_register, __bundle_modules)
-- ..
-- even more lines here
-- ..
end)
This is the script you then have to add to the object in the TTS scripting window and use the Save and Play button. The same logic applies for the UI scripts.
If the example code doesn’t have a title it means there’s no bundled script available, and you have to include the script as it is provided in the example.